Introduction
With the introduction of the 5.4.10 release of ECS, Evolve IP has provided customers with a more streamlined way to implement operational hours and holiday scheduling. Please see below how to switch your contact center to use the new ECS Schedule feature. If you need assistance with using non-schedule functionality, please refer to Check Operational Status and Special Days.
Configuring Special Days
Within Implementation, navigate to Special Days.
- Select the icon to set up pre-configured US National Holidays.
Using the pre-set US National Holidays will allow the system to auto-calculate Holiday dates for future years.
Once selected the system will assign the default 11 Special Days based on common US National Holidays.
Organizational administrators may remove or add any additional Special Days (Holidays) via the New or Delete icon. They can also add Temporary Closing events, such as company meetings or weather emergencies.
How to Create a Schedule
- Navigate to the Schedule tab within Implementation.
Create a Weekly Schedule
- In the Weekly Schedule section select the New
- Provide the Schedule with a name.
- Select the icon to navigate to the day/hour configuration.
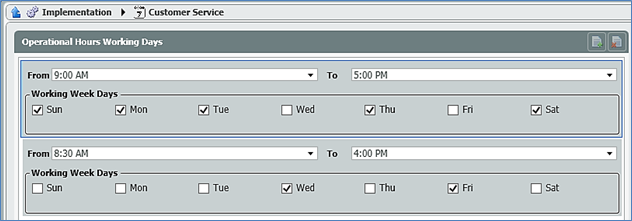
Select the New icon and select the days and times for this schedule. Additional Rows can be added for days that contain separate times.
How to Create a Special Days Calendar
- In the Special Days Calendars section select the New
- Provide the Schedule with a name.
- Select the icon to navigate to the Special Day configuration.
- Select the New icon and set the desired Calendar Label and Calendar Year.
For ease of use, the label year and name can be the same.
- Select the icon to navigate to the Special Day configuration.
- Select the Create Special Days icon to automatically assign your special days the correct day for the specific year.
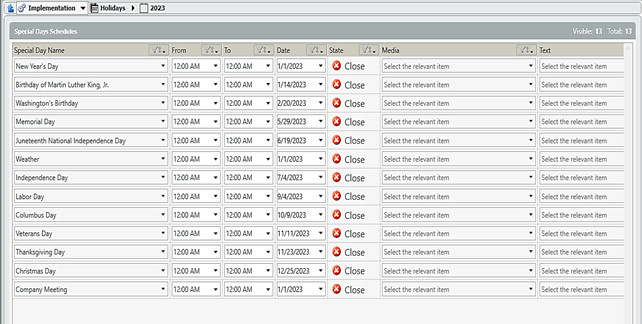
Feel free to make any of the adjustments below. Remember to remove the temporary closing days in the example Company Meeting and Weather as we will use them in a different section.
NOTE: Any Special Days that were added manually will automatically be added to this screen with a date of 1/1/20##.
- Special Day Name denotes the name of the configured special day.
- From indicates the beginning time the special day will use.
- A default value of 12:00 AM is applied.
- To indicates the ending time the special day will use.
- A default value of 12:00 AM is applied.
- Date the set date of the special day.
- Default value is applied via pre-configured values from US National Holidays.
- State Open or Closed.
- A default state of Closed is applied which will indicate an all-day closure.
- Media signifies the Media Repository file that should play during the configured special day.
- Text signifies the Text Repository file that should play during the configured special day.
This process can be repeated for additional years to pre-configure the Holidays.
Creating a Temporary Closing and Company Meeting Calendar
- In the Temporary Closing and Company Meeting Calendar section select the New
- Provide the Schedule a name.
- Select the icon to navigate to the Special Day configuration.
- Select the New icon and set the desired Calendar Label and Calendar Year.
For ease of use, the label year and name can be the same.
- Select the icon to navigate to the Temporary Closing and Company Meeting configuration.
Select the New icon.
- Special Day Name denotes the name of the configured special day. In this example Company Meeting or Weather.
- From indicates the beginning time this special day will use.
- A default value of 12:00 AM is applied.
- To indicates the ending time this special day will use.
- A default value of 12:00 AM is applied.
- Date the set date of the special day.
- A default value of 1/1/20## is applied.
- State
- The default state of Closed is applied and cannot be modified.
- Media signifies the Media Repository file that should play during the configured special day.
- Text signifies the Text Repository file that should play during the configured special day.
Now that your Schedule Data has been set up, please save your configuration. Next please refer to the Check Schedule activity configuration. This will guide you on how to configure your schedules and preferred greetings for use within your Business Process or Channel interaction flows.


