In This Article
Overview
This article outlines all of the prerequisites and requirements, which will help you plan your Teams Direct Routing deployment in your Office 365 tenant. For a smooth implementation of direct routing, we strongly suggest you review everything on this page before moving forward.
Microsoft's Licensing Requirements
The licenses listed here are for each user that will be enabled for Teams Direct Routing:
Required for all user accounts, a Microsoft Base Plan that includes Microsoft Teams:
- Small Business Plans (each plan has a max of 300 licenses per Office 365 tenant)
- Microsoft Teams Essentials
- Microsoft 365 Business Basic
- Microsoft 365 Business Standard
- Microsoft 365 Business Premium
- Commercial Enterprise Plans
- Office 365 F3, E1, E3, or E5
- Microsoft 365 F1, F3, E3, or E5
- Non-Profit Enterprise Plans (verify this list with your reseller)
- Office 365 Nonprofit E1, E3, or E5
- Microsoft 365 Nonprofit E3 or E5
- Education Enterprise Plans (verify this list with your reseller)
- Office 365 Education A1, A3, or A5
- Microsoft 365 Education A3 or A5
- Small Business Plans (each plan has a max of 300 licenses per Office 365 tenant)
Required for all plans that include MS Teams, a Microsoft Teams Phone Standard add-on license (already included with the A5 & E5 plans).
- Optional for all plans that include MS Teams, a Microsoft 365 Audio Conferencing add-on license (already included with the A5 & E5 plans).
NOTE
Starting March 1, 2022, Microsoft reduced the price for the M365 Audio Conferencing licenses to $2.50. Additionally, they introduced a new free licenses that can be assigned to any user account that's assigned a base plan that includes MS Teams.
The Microsoft 365 Audio Conferencing license is required to:
- Include a dial-in bridge for meeting attendees to dial into the meeting with a phone
- Add external participants to a scheduled meeting by dialing out from the meeting
- When joining a meeting, provide an attendee the option to have the meeting call their phone ("Call Me At" feature)
Escalate from a 1:1 call to a group call
Microsoft Documentation: Microsoft 365 Audio Conferencing
IMPORTANT
Evolve IP uses Microsoft's multi-tenant (carrier) model for direct routing. For this type of configuration Microsoft requires a license that includes MS Teams be assigned to a user/service account for each routing domain added to your Office 365 tenant. The domains are used to route your voice traffic to an Evolve IP voice gateway (PSTN Gateway).
This is a Microsoft requirement to enable & configure Microsoft's back-end voice environment, and it is a temporary license assignment for the configuration. After the configuration has been completed, the licenses can be removed from the user/service accounts and repurposed to other users in the organization.
Any license that includes MS Teams can be used, including the Microsoft Teams Exploratory trial license and the Teams Phone Resource Account license.
Microsoft 365 User Accounts & Roles
Teams Direct Routing User/Service Accounts
As stated above, Evolve IP uses Microsoft's multi-tenant (carrier) model for direct routing. For this type of configuration Microsoft requires a user/service account be permanently assigned to each routing domain added to your Office 365 tenant.
These accounts do not need any special permissions or assigned any roles. Additionally:
- During the back-end direct routing configuration, these accounts must be assigned an Office 365 license that includes MS Teams (e.g. Office 365 E1, E3, E5, etc.). This turns on the Microsoft enterprise voice services for the routing domains added to your Office 365 tenant.
- After the configuration has been completed, the licenses can be removed and repurposed to other user accounts.
- The user/service accounts can also be disabled (sign-in blocked), but they can never be deleted – this will break the direct routing back-end configuration.
Here's an example of the routing domains and user/service accounts for a US configuration:
| Location | Routing Domain* | User/Service Account UPN | Temp License |
|---|---|---|---|
| Evolve IP East (PHL) | c1005437.phl01.us.teams.evolveip.net | eip-tdr@c1005437.phl01.us.teams.evolveip.net | Office 365 E1 |
| Evolve IP West (LAS) | c1005437.las01.us.teams.evolveip.net | eip-tdr@c1005437.las01.us.teams.evolveip.net | Office 365 E1 |
* Note: The routing domains are examples only. You will receive unique routing domains for your configuration from our delivery team.
IMPORTANT
The user/service accounts assign to your routing domains can be disabled (sign-in blocked), but they should never be deleted. This will break your direct routing back-end configuration.
User Accounts for Managing Teams Direct Routing
If you require tight control over over the permissions assigned to users managing your Office 365 environment, or you would like to assign permissions to users in your support/helpdesk staff, you can use the below list of roles for guidance. Detailed information about all roles and their associated permissions can be found in Microsoft's Admin Role article.
Domain Name Administrator: Required role to add the routing domains to your Office 365 tenant. After the routing domains have been added and verified, this role is no longer required.
- User Administrator: Required role to create the user/service accounts for each routing domain added to your Office 365 tenant. After the user/service accounts have been created this role becomes optional for creating users and assigning licenses.
- Teams Communications Administrator: For organizations set to the Teams Only coexistence mode, this role is required for creating, managing, and viewing a Teams direct routing configuration, and provisioning or deprovisioning direct routing users. This role does not have the permissions to manage a Skype for Business online configuration.
- Skype for Business Administrator: For organizations that still have a coexistence with Skype for Business Online users, this is a required role for enabling Teams users for direct routing, which includes enabling enterprise voice, hosted voicemail, and setting a direct routing phone number. For organizations set to the Teams Only coexistence mode, this role is not required.
- Teams Administrator: Optional role for creating, managing, and viewing a Teams direct routing configuration, and provisioning or deprovisioning direct routing users. Required role for managing Teams IP Phone policies.
- Teams Devices Administrator: Optional role to configure and manage Teams enabled devices (desk phones, conference room devices, etc.).
TIP
For step-by-step instructions to manage role assignments in Azure AD, check Microsoft's Assign Directory Roles to Users article. To manage role assignments in the M365 Admin Center, check Microsoft's Assign Admin Roles article.
Evolve IP Support User Account
For Evolve IP to configure, manage, and support your Teams direct routing environment we require a user account with the following roles:
- Domain Name Administrator: This role assignment is temporary, and only needed to add the routing domains to your Office 365 tenant. After the routing domains have been added and verified, this role can be removed from the user account.
- User Administrator: This role is required to create the user/service accounts for the routing domains. After the user/service accounts have been created, this role becomes optional for managing your user accounts and assigning licenses.
- Teams Communications Administrator: Required role to create, manage, and support your direct routing configuration including provisioning/deprovisioning direct routing user accounts.
- Skype for Business Administrator: For organizations that still have a coexistence with Skype for Business Online users, this is a required role to provision and manage your Teams direct routing users.
Assigning MFA to the Evolve IP Support Account
Evolve IP has a large team of employees that can implement and support your Teams direct routing environment. Unfortunately, when you configure the Evolve IP Support account with MFA we may not be able to leverage our entire team to support your environment 24/7.
We recently rolled out a solution to support user accounts with MFA enabled, but the solution is limited to certain MFA providers.
Microsoft's Azure AD MFA service is supported. However, if your MFA provider is not supported, we will ask that the user account not be configured with MFA.
Instead of enabling MFA, you can keep the user account disabled until you need assistance from us. When submitting a ticket or sending an email to our support team, make sure you let them know that the user account is enabled, or ask them to reach out to you so you can enable it.
Naming Conventions
Every organization has its own naming conventions, and Evolve IP is no different. The steps in this getting started guide use our naming conventions, and we strongly suggest you use them for two important reasons:
- If you need to get support from Evolve IP, our support teams will have no problem identifying, verifying, and if needed, troubleshooting your direct routing configuration.
- If sometime in the future you decide to use Evolve IP for managing your direct routing configuration and user provisioning, we can easily accommodate that role.
If you choose to use your own naming conventions, that's totally fine. We understand.
Voice Routing from Office 365 to Evolve IP
NOTE
Evolve IP uses Microsoft's multi-tenant (carrier) model for direct routing. This type of configuration requires the use of PowerShell commands – it cannot be created in the Teams admin center. However, after the configuration has been completed you will be able to view and manage the voice routes in the Teams admin center, but there will be no SBCs listed.
Here's an example screenshot, which is normal.
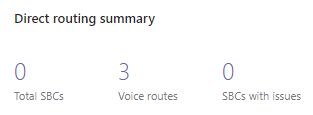
In the US, Evolve IP has two primary datacenters for its voice infrastructure. One in Las Vegas for users located in the west, and one in Philadelphia for users located in the east. When configuring your voice routes in Office 365, you will want to make one of the two locations set as a primary route and the other as a secondary route. For example:
- Users located on the east coast would use the Philadelphia (east) voice infrastructure for their primary route, and the Las Vegas (west) voice infrastructure for their secondary route.
- Users located on the west coast would use the Las Vegas (west) voice infrastructure for their primary route, and the Philadelphia (east) voice infrastructure for their secondary route.
- For users located in the middle of the US, you will need to choose a primary/secondary combination that best works for their location. We recommend using the Mississippi River as a dividing line.

NOTE
For our EU locations, Evolve IP has datacenters available in Amsterdam and Delft in the Netherlands. These datacenters offer the same redundant infrastructure and we will advise you on the optimal primary route upon delivery of your unique routing domains.
When you configure your Office 365 tenant for Teams Direct Routing, you will create a route for each location, and then create two routing policies that makes one of the routes primary and the other secondary. All of this gives you redundancy regardless of where your users are physically located.
Additionally, when you start bulk-provisioning users for direct routing, you will want to identify which users should be provisioned in the east, and which should be provisioned in the west. Later in this article we show you how you can create a CSV report of your user accounts that can be used for bulk-provisioning. Once you have this, you can add a location column to the CSV and assign each user a primary location.
Teams Direct Routing Domains
Evolve IP will provide you with 2 domains that will need to be added & verified in your Office 365 tenant. The domains are used for routing your voice traffic to Evolve IP's voice gateways, and is a Microsoft requirement for Teams Direct Routing to work. Additionally, Evolve IP is responsible for managing the DNS zones & records associated with the domains. Therefore, we will need to work together to get your domains added and verified.
NOTE
Microsoft requires that a user/service account be created and permanently assigned to each of the routing domains added to your Office 365 tenant. These user/service accounts do not need any special permissions, and they should never be deleted. Here's an example using our naming conventions:
- eip-tdr@c123456.phl01.us.teams.evolveip.net
- eip-tdr@c123456.las01.us.teams.evolveip.net
Additionally, during the back-end direct routing configuration, an Office 365 license that includes MS Teams (e.g. Office 365 E1, E3, or E5) will need to be temporarily assigned to each of the user accounts.
Here's an example for a US configuration:
| Location | Routing Domain* | User/Service Account UPN | Temp License |
|---|---|---|---|
| Evolve IP East (PHL) | c1005437.phl01.us.teams.evolveip.net | eip-tdr@c1005437.phl01.us.teams.evolveip.net | Office 365 E1 |
| Evolve IP West (LAS) | c1005437.las01.us.teams.evolveip.net | eip-tdr@c1005437.las01.us.teams.evolveip.net | Office 365 E1 |
* Note: The routing domains are examples only. You will receive unique routing domains for your configuration from our delivery team.
PowerShell vs. Teams Admin Center
You have to use PowerShell to create a direct routing configuration to Evolve IP. Recently, Microsoft added the ability to create a direct routing configuration in the Teams admin center. However, this only works for organizations that purchase and manage their own SBCs (PSTN Gateways).
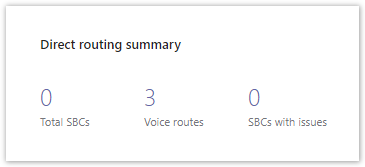
Evolve IP uses Microsoft's multi-tenant (carrier) model for direct routing, and this type of configuration cannot be created in the Teams Admin Center (TAC). However, after the configuration has been completed you will be able to view and manage the voice routes in the Teams admin center, but there will be no SBCs listed.
The below screenshot is normal.
PowerShell Requirements
Until Microsoft adds all of the necessary UI elements to the Teams Admin Center (TAC), PowerShell will be required to perform the direct routing back-end configuration and user provisioning. Anyone performing the back-end configuration and user provisioning with PowerShell will need to meet the following requirements on their computers:
- PowerShell version 5.1 (included in Windows 10 & Server 2016/2019).
- Depending on your environment, you may need to be a local administrator on your computer.
- Install the Microsoft Teams PowerShell module: Install-Module -Name MicrosoftTeams -Scope CurrentUser
- If you already have the Microsoft Teams PowerShell module installed, make sure you have the latest version: Update-Module MicrosoftTeams
IMPORTANT: If you have the Skype for Business PowerShell Module installed, you no longer need it. It should be uninstalled from from your computer.
UPDATES
With version 2.0 and later of the Teams PowerShell module you do not need to manually connect to the Skype for Business Online services. All you need to do is run Connect-MicrosoftTeams to connect to the MS Teams services, and then run a CsOnline command (E.g. Get-CsOnlineUser). At that point the Microsoft Teams PowerShell module will connect you to the Skype for Business Online services.
With version 4.0 and later of the Teams PowerShell module, Microsoft has deprecated the Set-CsUser command for TeamsOnly organizations, and they have reduced the number of properties shown in the Get-CsOnlineUser command.
Additionally, Microsoft has provided a means in the Teams Admin Center to provision/deprovision a Teams user for direct routing, and they have introduced two new PowerShell commands:
All PowerShell commands in our documentation have been updated to reflect the changes made in the v4.0 Teams PowerShell module.
NOTE
If you are familiar with using code editors, you can use one of them to stage the PowerShell commands. The PowerShell ISE comes with Windows, and VSCode can be downloaded and installed separately. Do not use a code editor to run self-contained PowerShell scripts (.ps1 files). You should run those from a PowerShell window.
NOTE
The Microsoft Teams PowerShell module uses lyncdiscover.yourdomain.com to find and connect to your services. If you are connecting to the service with a user account that is not a .onmicrosoft.com cloud-only account, you need to make sure you have a DNS CNAME entry in your domain's DNS zone pointing to webdir.online.lync.com.
For example, if the user account you use to sign in is "jsmith@contoso.com", you will add the following DNS CNAME entry for lyncdiscover in the contoso.com DNS zone.
; Hostname                TTL     Type  Target
lyncdiscover.contoso.com. 3600 IN CNAME webdir.online.lync.com.
Connect to the MS Teams Services
Use the below PowerShell commands to sign into your MS Teams services using a user account with the proper permissions. Microsoft's MFA service is supported.
# Import the Microsoft Teams PowerShell module & connect to the services
Import-Module MicrosoftTeams
Connect-MicrosoftTeams
Disconnect from the MS Teams Services
Disconnecting is not a hard requirement. If you just close the PowerShell window, the connected session will eventually time out on Microsoft's side.
Disconnect-MicrosoftTeams
Teams Upgrade Policy & Coexistence Mode with SfB
Direct Routing is only supported with Microsoft Teams, and all Teams user accounts configured for direct routing must have an upgrade policy set to the Teams Only coexistence mode. If your organization is only using Teams (no Skype for Business users), setting the coexistence mode to Teams Only in the Org-Wide Teams Upgrade settings is recommended. Note: There is no reverting back from the Teams Only coexistence mode. Once you set it to Teams Only all Skype for Business users will be forced to use Microsoft Teams.
IMPORTANT
On June of 2021 Microsoft retired the Skype for Business Online services for all Office 365 customers. Microsoft did make exceptions for some of their customers that requested a delay, but for the most part, all customers have been migrated off Skype for Business Online.
After Microsoft retired Skype for Business Online most customer's Teams Upgrade Policy & Coexistence Modes were set to Teams Only.
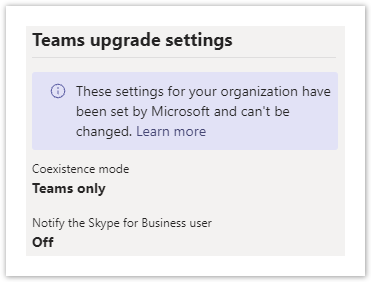
However, we do recommend you check your TAC for your current org-wide coexistence mode: Teams > Teams Upgrade Settings.
You can also check your current org-wide coexistence mode by running this PowerShell command: (Get-CsTenant).TeamsUpgradeEffectiveMode
And you can check the status of your users in the TAC: Users > Manage Users
If your organization is using Skype for Business Online, you will need to set a coexistence mode on a per-user basis. So that you understand the implications of setting individual users to Teams Only while you have other users still using Skype for Business Online, here's a list and description of each coexistence mode:
- Islands - Use this setting if you want users to be able to use both Skype for Business and Teams simultaneously.
- Skype for Business only - Use this setting if you want your users to only use Skype for Business.
- Skype for Business with Teams collaboration - Use this setting if you want your users to use Skype for Business in addition to using Teams for group collaboration (channels).
- Skype for Business with Teams collaboration and meetings - Use this setting if you want your users to use Skype for Business in addition to using Teams for group collaboration (channels) and Teams meetings.
- Teams only - Use this setting if you want your users to use only Teams. Note that even with this setting, users can still join meetings hosted in Skype for Business.
Reminder
A user has to be set to the Teams Only coexistence mode for Teams direct routing to work.
IMPORTANT
If you are migrating users from Skype for Business in batches, you will need to set a user's coexistence mode individually. After you finish the migration make sure you set your global coexistence mode to Teams Only. That way new user accounts will automatically be set to Teams Only.
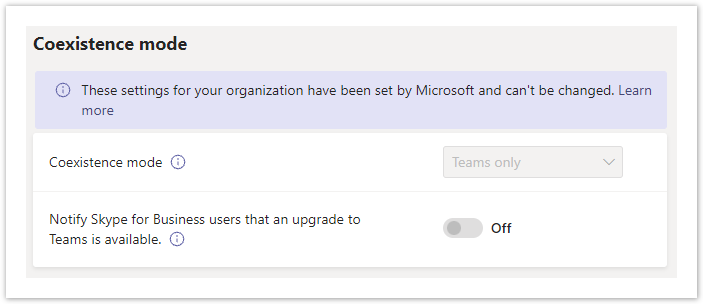
Set the Org-Wide Coexistence Mode
Teams Admin Center : Teams > Teams Upgrade Settings
Set the Coexistence Mode Per User
If you are not migrating your users from Skype for Business Online to Teams all at the same time, you will need to assign a Teams Only coexistence mode to each user individually. Additionally, users with an explicit coexistence mode set against their account will override the above org-wide coexistence mode.
To check a user account:
Teams Admin Center: Users > Manage Users > Click on a user's Display Name to view their settings:
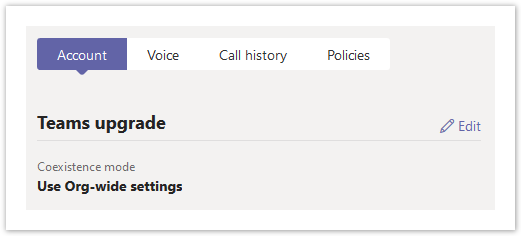
- If you want the user to follow the above org-wide setting, edit Teams Upgrade, and set the Coexistence Mode to Use Org-Wide Settings.
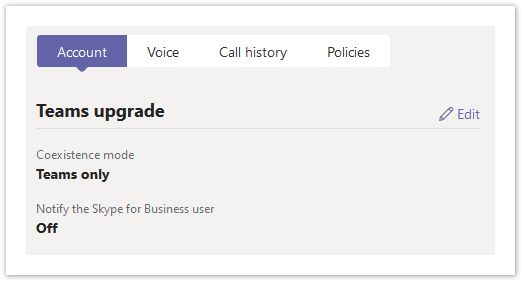
- If you want to set the user to an explicit setting, edit Teams Upgrade, and set the Coexistence Mode to the desired state. For example, Teams Only.
- When a user is provisioned for Teams Direct Routing, their Coexistence Mode should be checked first. If it's not set to Teams Only, it should be changed during the provisioning process.
Coexistence Mode PowerShell Commands
You can use the below PowerShell commands to check and change the org-wide settings, and to check and change an individual user. Make sure you connect to your Microsoft Teams services before running the commands.
# Check the Org-Wide setting
(Get-CsTenant).TeamsUpgradeEffectiveMode

# Change the Org-Wide setting to Teams Only
Grant-CsTeamsUpgradePolicy -PolicyName UpgradeToTeams -Global

# List all users along with their effective coexistence mode
Get-CsOnlineUser -ResultSize 2147483647 | FT DisplayName, TeamsUpgradePolicy, TeamsUpgradeEffectiveMode

# Export a list of all users along with their Teams upgrade settings to CSV
Get-CsOnlineUser | Select DisplayName, UserPrincipalName, TeamsUpgrade* | Export-Csv "C:\Path\to\TeamsUpgrade.csv" -nti

# Set a user to use the org-wide setting
Grant-CsTeamsUpgradePolicy -Identity user@domain.com -PolicyName $Null

# Set a user to ignore the org-wide setting and use Teams Only mode.
Grant-CsTeamsUpgradePolicy -Identity user@domain.com -PolicyName UpgradeToTeams
Teams Calling Policy
When a user is assigned a Teams Phone add-on license and provisioned for direct routing, they are able to make private calls from the Teams client. This capability is provided by two Teams Calling policies, Global & AllowCalling. If a user is unable to make calls from the Teams client after being provisioned for direct routing, check the user's settings, and make sure the Teams calling policies are properly configured.
Teams calling policies can be viewed in the Teams Admin Center or by using the below PowerShell.
Teams Admin Center : Voice > Calling Policies
- Edit a calling policy and make sure Make Private Calls is set to On

Teams Caller ID Policy
Caller ID policies are used to change or block the Caller ID (also called a Calling Line ID) for users. By default, the user's phone number is displayed when a call is made to a PSTN phone number such as a landline or mobile phone.
The Evolve IP voice infrastructure cannot accept a call from a Teams user when their caller ID policy is set to Anonymous. The policy must be set to User's Number.
Teams Admin Center : Voice > Caller ID Policies
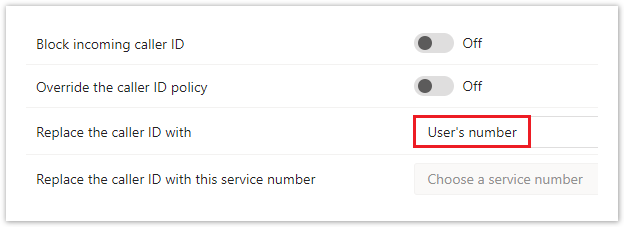
- Override the caller ID policy - This should be turned OFF. Turning it on allows users to choose whether to display their caller ID or set it to Anonymous.
- Replace the caller ID with - This should be set to User's Number. You can also set it to use a Microsoft provided service phone number.
Teams Call Park Policy
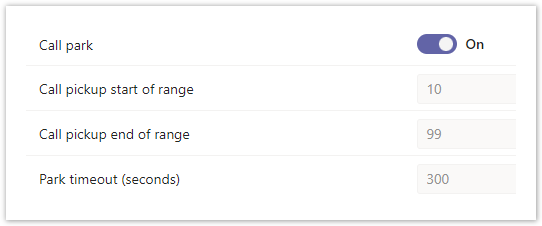
By default Microsoft sets the Call Park "Global" policy to OFF. If you want your users to be able to use the Call Park feature, you need to turn this on in the Teams Admin Center (TAC). If you only want a subset of your users to have this feature, you'll need to create a new Call Park policy, and assign those users to the policy.
Teams Admin Center : Voice > Call Park Policies
CSV User Report - Office 365 Admin Center
If needed, you can use the following steps to generate a CSV report for every user account in your Office 365 tenant. This report can be used to determine whether a user is properly licensed for Teams Direct Routing. Additionally, if you add columns for your Evolve IP provided phone numbers and location, you can use it for provisioning direct routing to your users.
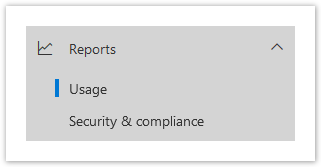
- Sign into the Office 365 Admin Center: https://admin.microsoft.com
- Navigate to the Reports section and select Usage.
- On the Usage page, look for the Active users - Microsoft 365 Services card, and click View More.
- On the User Activity page, scroll down to the User Activity Table, and click Export on the left-hand side of the table.
- You will be prompted to save a CSV file, which should be saved to your local computer.
- At a minimum, you should keep following columns in the CSV:
- Display Name
- User Principal Name
- Is Deleted
- Has Teams License
- Assigned Products
CSV User Report - PowerShell
Optionally, you can create a CSV user report using the Microsoft Teams PowerShell module. Keep in mind this module will only return users who have been licensed for Microsoft Teams or Skype for Business Online. Make sure you connect to your Microsoft Teams services before running the commands.
# Define a local path to save your CSV file
$CsvFilePath = "C:\path\to\file.csv"

# Get all of the Teams/SfBO users
$CsOnlineUsers = Get-CsOnlineUser -ResultSize 2147483647 | Select DisplayName, UserPrincipalName, AccountEnabled, IsSipEnabled, TeamsUpgradeEffectiveMode

# Display the list of users
$CsOnlineUsers | Sort DisplayName | FT

# Save the list of users to a CSV
$CsOnlineUsers | Sort DisplayName | Export-Csv $CsvFilePath -NoTypeInformation
Properties:
- DisplayName - The user's display name.
- UserPrincipalName - The user's Office 365 sign in address.
- Enabled - If enabled is true this indicates that the user is licensed for MS Teams or Skype for Business Online. If enabled is false, it indicates that the user is blocked from signing in, or the user is not licensed for MS Teams or Skype for Business Online.
- TeamsUpgradeEffectiveMode - This indicates the user's current Teams Upgrade Coexistence Mode. For Teams Direct Routing to work, this will need to be set to TeamsOnly.
Deployment Checklist
Here's a checklist you can use for your direct routing deployment.
Environment Discovery & Planning
- Verify all licensing requirements
- Determine a list of pilot users
- Verify your Teams upgrade coexistence mode
- Verify your Teams voice calling policies
- Verify your Teams caller ID policies
- Verify your Teams call park policies
- Verify that you can connect to your Office 365 tenant using the Microsoft Teams PowerShell module
Office 365 Tenant Configuration
- Add & verify the routing domains provided by Evolve IP
- Create a user/service account for each routing domain and assign a temp Office 365 license
- Configure Teams Direct Routing
- Create the PSTN Usage Objects
- Create the Voice Routes
- Create the Voice Routing Policies
- Create the Phone Number Normalization Rules & the Tenant Dial Plan
- Wait 24 to 48 hours, and then remove the temp Office 365 licenses from the user/service accounts
User Provisioning
- Add/purchase the licenses for the pilot group
- Assign the licenses & provision the pilot group
- Test and verify all features & functions with the pilot group
- Add/purchase the licenses for remaining users
- Assign the licenses & provision the remaining users
Next Steps
- Teams Direct Routing - 02 - Add the Domains
- Teams Direct Routing - 03 - Configure Direct Routing
- Teams Direct Routing - 04 - User Provisioning